How to Make a PDF in MS Publisher
What are your options?
Unless you are a graphic pro who deals with print professionals on a regular basis, you may not have the full version of Adobe Acrobat that makes PDF creation a snap.
We have good news for you. You can find out more about PDF creation tools (using some little known FREE programs) by downloading the “Insider Tips” report. After downloading, start reading on page 19 and you will find the details for making a PDF with the free sources.
Another Way to Make a PDF- from Publisher 2007
One of the great things about the new Microsoft Publisher is that you can now save your publication as a “PDF” directly inside Publisher just as easy as if it were a document.
You’ll find the PDF save option under the “File>Save As” dialog.
How to Make it Work, It’s as simple as 1-2-3
In making the PDF from Publisher 2007 there are just a couple of VERY IMPORTANT OPTIONS we want to tell you about that will make the difference between saving a PDF file your print professional will like and one your print professional will not like.
So, let’s say you have a document open and you want to save it as a PDF. Just follow along with the pictures, descriptions and arrows and you will find it painless. You’ll be a certified PDF-SAVER when you are done.
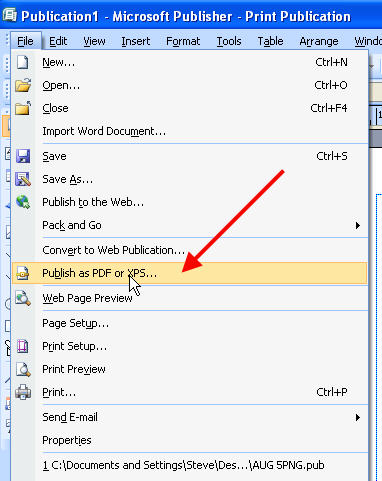
On the top menu bar of Microsoft Publisher 2007 go to FILE> then scroll down the left side of the file menu until you see “Publish as PDF or XPS..” You will want to select that.
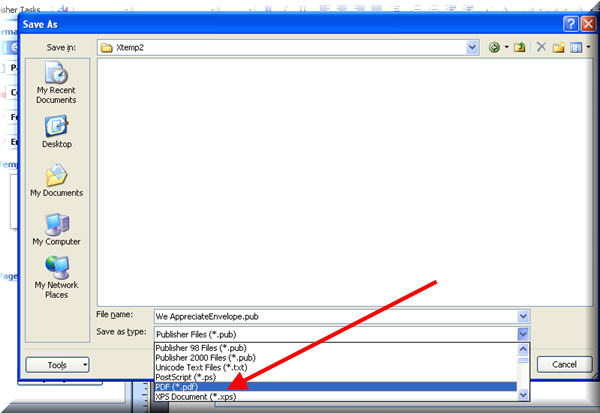
Alternatively, if you have a document open that you want to save as a PDF, you can select “Save As” from the same file menu just above the “Publish as PDF or XPS” and the “Save As” dialog box will open and look something like the picture below.
You may have to press the dialog box drop down button to find the “PDF (*.pdf)”
.
Okay, let’s assume you got it right and can see something similar to the picture above. Go ahead and select the “PDF” in the drop down box and the “SAVE AS” dialog box will change to something like below.
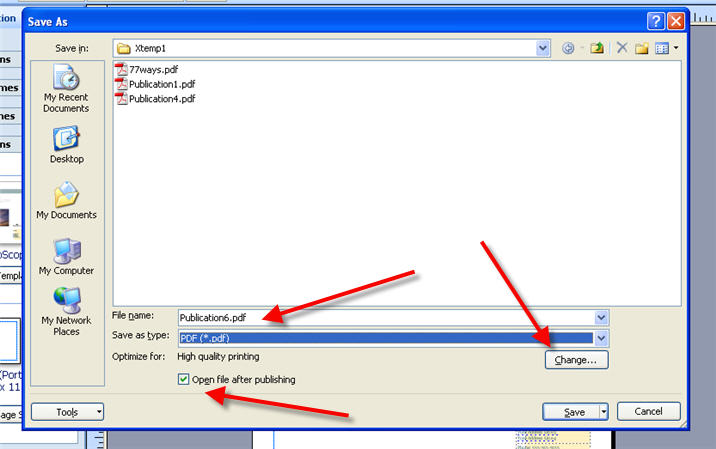
Look at the three red arrows and we’ll briefly discuss their importance. These are the VERY IMPORTANT OPTIONS we referred to above.
You will see just below the “save as type” drop down box there is “Optimize for: High Quality printing” That is probably a good setting for most desktop printing or even photocopiers. But, there is a better one for print professionals, if that is where you intend to send your file for output.
Click the “Change” button and the “Publish Options” new dialog box will open.
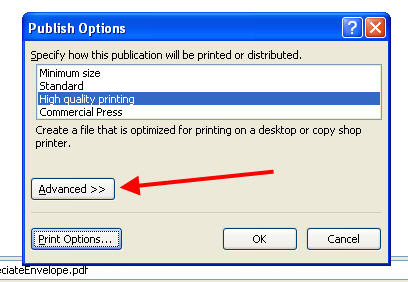
Click the “Advanced” button. The “Publish Options” dialog box will expand as below.

If your file is going to be given to a print professional for output, you’ll want to change the quality to “Commercial Press”. Regardless, this setting will give you the highest possible resolution of your graphic files. Another option to note is the check box titled “Bitmap text when fonts may not be embedded. "You should always make sure this box is checked.
Why should you check the Bitmap font box? Well, because you may have used a font in your publication that has not licensed itself to be embedded in a PDF. And, Microsoft respects those rights of refusal.
What would your publication look like without that font? You generally will not know you try to make a pdf and it fails, or if you do get a pdf…the font becomes garbled. Either way, Microsoft Publisher has a work- around so you can still get your project printed with the font you have chosen.
MS Publisher merely converts the font into a graphic. That’s what the Bitmap check box does. So, when you give your PDF to another user, they can print and see exactly the same thing as you did on your computer.
That’s it. Now just click “OK” that will close the dialog box and return you to the “SAVE AS” dialog. Select “SAVE” and your document is now a PDF.
Now, one last thing you need to know. When you press the “SAVE” after you have selected “Commercial Press” in the “Publish Options” dialog box, you may get an another box pop-up such as this..

You may not see this unless you have selected the “commercial Press” setup. The reasons could be numerous. There may be design errors that Publisher has detected. However, the most likely cause is that Publisher’s default color mode is RGB. The “Commercial Press” setting expects the color mode to be CMYK.
This can be a problem if your instructions to you print professional are that you are sending a two-color job.
Pressing the “Fix” button will give you some hints as to the problems Publisher has detected. The left side of your Publisher Screen will display the results.
|
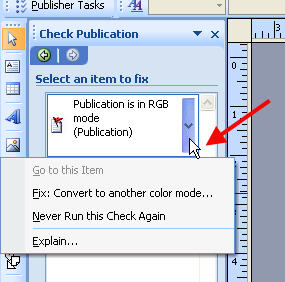
After you have made the fix, You can proceed to save the PDF. Alternatively, you could have just pressed the “SAVE” button when the design checker box opened and your PDF would have been created.
HINT: Doing that may present problems for you when you hand off your file to the print professional. Extra costs may be involved in making the repairs to get the file print-ready. If you can fix a design flaw now, do it.
If this is confusing to you, especially regarding color modes. Don’t fear. That’s where we can help. The more work you can do on your project yourself, the less expensive it will be to get it print ready.
On the other hand, do what you can and let us know where to pick up the ball so-to-speak.
The staff at West Printing are experts and will help you along the way. All you have to do is ask.
Hope this helps.
Any questions or comments, Call
Steve Robison
West Printing Co.
327 12th Street
Toledo, OH 43604
(419) 246-0857